Saturday, 5 April 2025

How to make responsibilities as read only in oracle apps EBS R12 Using Custom.Pll Or Creating a read only Responsibility in oracle apps EBS R12 Using Custom.Pll


How to make responsibilities as read only in oracle apps EBS R12 Using Custom.Pll

Or Creating a read only Responsibility in oracle apps EBS R12 Using Custom.Pll


·  Navigate to the AU_TOP/resource directory on the application server:

cd $AU_TOP/resource

·  Open the CUSTOM.pll file using  Forms Builder.


--

  -- Real code starts here

  --

   formname    VARCHAR2 (30)  := NAME_IN ('system.current_form');

   blockname   VARCHAR2 (30)  := NAME_IN ('system.cursor_block');

   itemname    VARCHAR2 (240) := NAME_IN ('system.cursor_item');

BEGIN

     --    FND_MESSAGE.SET_STRING('USER_NAME = ' ||FND_PROFILE.VALUE('USER_NAME'));

     --    FND_MESSAGE.SHOW;

     --    FND_MESSAGE.SET_STRING('USER_ID = ' ||FND_GLOBAL.USER_ID);

     --    FND_MESSAGE.SHOW;


   IF event_name = 'WHEN-NEW-FORM-INSTANCE'

   THEN

      IF fnd_global.user_id IN ('1161', '1191')

      THEN                                                         --'1251'--

         --FND_MESSAGE.SET_STRING('USER_ID = ' ||FND_GLOBAL.USER_ID);

         --FND_MESSAGE.SHOW;

         BEGIN

            COPY ('Entering app_form.query_only_mode.', 'global.frd_debug');

            COPY ('YES', 'PARAMETER.QUERY_ONLY');

            app_menu2.set_prop ('FILE.SAVE', enabled, property_off);

            app_menu2.set_prop ('FILE.ACCEPT', enabled, property_off);

            formname := NAME_IN ('system.current_form');

            blockname := GET_FORM_PROPERTY (formname, first_block);


            IF formname <> 'FNDRSRUN'

            THEN

               -- This is added for ignor the Submit a New Request Form ---


               --FND_MESSAGE.SET_STRING('formname = ' ||formname);

               --FND_MESSAGE.SHOW;

               WHILE (blockname IS NOT NULL)

               LOOP

                  IF (GET_BLOCK_PROPERTY (blockname, base_table) IS NOT NULL )

                  THEN

                     SET_BLOCK_PROPERTY (blockname,insert_allowed,property_false);

                     SET_BLOCK_PROPERTY (blockname,update_allowed,property_false);

                     SET_BLOCK_PROPERTY (blockname,delete_allowed,property_false);

                  END IF;


                  blockname := GET_BLOCK_PROPERTY (blockname, nextblock);

               END LOOP;

            END IF;

         END;

      END IF;

   END IF;

END event;


Before putting the Custom.pll file into the Server Please take a Backup First. The both Files CUSTOM.pll and CUSTOM.plx for Safe.Then Move the CUSTOM.pll into the server and then Compile the CUSTOM.pll script into the Server using Putty command.


frmcmp_batch module=CUSTOM.pll userid=apps/apps output_file=$AU_TOP/resource/CUSTOM.plx compile_all=special module_type=LIBRARY


After compile the command in Putty. Please closed ALL the tabs of the Browsers and then closed the Browsers so that use can see the effects of the custom.pll Files.


Then Login to the Ebs using the Example User Name : 92526 That’s User ID Is (1251).

That make all responsibilities as read only using CUSTOM.pll


One of my Colleague requirement is Please open the ‘Submit a New Request’ Form so that User can Run the Reports. SO that I have added an command in Form that is given below.


Saturday, 19 October 2024

How to change Employee Number Generation from Manual to Automatic in Oracle HRMS (When attempting to apply for a job in iRecruitment)

When attempting to apply for a job in iRecruitment, the following error occurs:

ERROR:

You must enter an Application Number.

Solution:

How to change Employee Number Generation from Manual to Automatic in Oracle HRMS

Changing Employee number generation from Manual to automatic without affecting current employee numbers unchanged. 


Attach concurrent program : "Change Person Numbering to Automatic" to your responsibility.

And run the program with parameter as Employee.


This will automatically change Business Group Info value of Employee Generation from Manual to automatic, So new employee will be given there employee number automatically.


Technically this program creates an entry at per_number_generation_controls with BG and next value.

Tuesday, 27 August 2024

Oracle Apps R12 FND_GLOBAL and FND_PROFILE and Import List of System Global values


Oracle Apps R12 FND_GLOBAL and FND_PROFILE and Import List of System Global values


We can find values of System global values using FND_PROFILE and FND_GLOBAL


FND_PROFILE

To manipulate values stored in client and server user profile caches.

Any changes you make to profile option values using these routines affect only the run-time environment. 

The effect of these settings end when the program ends, 

because the database session (which holds the profile cache) is terminated.


fnd_profile.value('PROFILEOPTION')

fnd_profile.value('MFG_ORGANIZATION_ID')

fnd_profile.value('ORG_ID')

fnd_profile.value('LOGIN_ID')

fnd_profile.value('USER_ID')

fnd_profile.value('USERNAME')

fnd_profile.value('CONCURRENT_REQUEST_ID')

fnd_profile.value('GL_SET_OF_BKS_ID')

fnd_profile.value('SO_ORGANIZATION_ID')

fnd_profile.value('APPL_SHRT_NAME')

fnd_profile.value('RESP_NAME')

fnd_profile.value('RESP_ID')

fnd_profile.value('PER_BUSINESS_GROUP_ID')

fnd_profile.value('GL_SET_OF_BKS_ID')

fnd_profile.value('CURRENT_ORG_CONTEXT')


FND_GLOBAL

The server-side package FND_GLOBAL returns the values of system globals, 

such as the login/signon or “session” type of values. 

You should not use FND_GLOBAL routines in your forms (that is on the client side). 

On the client side, most of the procedures in the FND_GLOBAL package are replaced 

by a user profile option with the same (or a similar) name. 

You should use FND_PROFILE routines in your forms instead.


fnd_global.USER_ID 

fnd_global.USER_NAME 

fnd_global.RESP_ID 

fnd_global.RESP_NAME 

fnd_global.APPLICATION_NAME 

fnd_global.APPLICATION_SHORT_NAME 

fnd_global.RESP_APPL_ID 

fnd_global.BASE_LANGUAGE 

fnd_global.CONC_LOGIN_ID 

fnd_global.CONC_PRIORITY_REQUEST 

fnd_global.CONC_PROCESS_ID 

fnd_global.CONC_PROGRAM_ID 

fnd_global.CONC_QUEUE_ID 

fnd_global.CONC_REQUEST_ID 

fnd_global.CURRENT_LANGUAGE 

fnd_global.CUSTOMER_ID 

fnd_global.EMPLOYEE_ID 

fnd_global.FORM_APPL_ID 

fnd_global.FORM_ID 

fnd_global.GET_SESSION_CONTEXT 

fnd_global.LANGUAGE_COUNT 

fnd_global.LOGIN_ID 

fnd_global.NEWLINE 

fnd_global.NLS_DATE_FORMAT 

fnd_global.NLS_DATE_LANGUAGE 

fnd_global.NLS_LANGUAGE 

fnd_global.NLS_NUMERIC_CHARACTERS 

fnd_global.NLS_SORT 

fnd_global.NLS_TERRITORY 

fnd_global.ORG_ID 

fnd_global.ORG_NAME 

fnd_global.PARTY_ID 

fnd_global.PER_BUSINESS_GROUP_ID 

fnd_global.PER_SECURITY_PROFILE_ID 

fnd_global.PROG_APPL_ID 

fnd_global.QUEUE_APPL_ID 

fnd_global.RT_TEST_ID 

fnd_global.SECURITY_GROUP_ID 

fnd_global.SERVER_ID 

fnd_global.SESSION_ID 

fnd_global.SUPPLIER_ID 

fnd_global.TAB


Where do we use FND_GLOBAL and FND_PROFILE?

We can use them any where in PL/SQL to get values dynamically as per the session. 

In Forms we can use only FND_GLOBAL not FND_PROFILE.


Initializing the Environment

   l_user_id       := fnd_global.user_id;

   l_resp_id       := fnd_global.resp_id;  

   l_resp_appl_id  := fnd_global.resp_appl_id;   


   fnd_global.APPS_INITIALIZE(l_user_id,l_resp_id, l_resp_appl_id);


Monday, 29 July 2024

Validate Invalid Objects in Oracle Database

 Validate Invalid Objects in Oracle Database


A) Find Invalid Objects:

1.To Find the number of invalid objects


select count(*) from dba_objects where status='INVALID';


select owner,object_type,count(*) from dba_objects where status='INVALID' group by owner,object_type;


2.To identify the object name and their types and owner:


select owner, object_name,object_type from dba_objects where status ='INVALID';


B) Try Manual method of validation:


Alter procedure <owner>.<procedure_name> compile;


Alter function <owner>.<function_name> compile;


Alter view <owner>.<view_name> compile;


Alter package <owner>.<package_name> compile;


Alter package <owner>.<package_name> compile body;


Alter materialized view <owner>.<Package_name> Compile;


In case you have lots of invalid objects, you can generate scripts that will generate the sqls for compiling the invalid objects :


In sqlplus connect as sys:


set heading off


spool compileinvalid.sql

select 'alter '||object_type|| ' ' || owner ||'.'||object_name || ' compile;' from dba_objects where status='INVALID';

spool off


Then run compileinvalid.sql in sqlplus prompt as sys user.


To compile invalid package body use:


alter package <package_name> compile body;


Another SQL Script: To Recompile Invalid Objects


set heading off

 set pagesize 0

 set linesize 79

 set verify off

 set echo off

 spool comp_all.sql

 select

     decode( OBJECT_TYPE, 'PACKAGE BODY',

     'alter package ' || OWNER||'.'||OBJECT_NAME || ' compile body;',

     'alter ' || OBJECT_TYPE || ' ' || OWNER||'.'||OBJECT_NAME || ' compile;' )

 from

     dba_objects a,

     sys.order_object_by_dependency b

 where

     A.OBJECT_ID = B.OBJECT_ID(+) and

     STATUS = 'INVALID' and

     OBJECT_TYPE in ( 'PACKAGE BODY', 'PACKAGE', 'FUNCTION', 'PROCEDURE',

                       'TRIGGER', 'VIEW' )

 order by

     DLEVEL DESC,

     OBJECT_TYPE,

     OBJECT_NAME;

 spool off


Saturday, 16 September 2023

How to Load a .csv file into Oracle Custom Forms via Push Button - EBS R12. How to upload file using Oracle Form

Here we create a form and add the button (File Location) and when the button is pressed, you will select a file such as ''Danish_Attandance.csv'' from your PC. When the file has been uploaded to the table, you can view the data in the following block by clicking the button (View).


Step 1:

First Make the CSV file for Upload in the Custom Form.


Step 2:

Make CTL File for Upload the Csv file data into the Table.


Step 3:

Create Custom Table (XX_TIME_ATTENDANCE_DATA_LOAD) for Store the Csv File Data.


CREATE SEQUENCE RKCM_UPLOAD_S

  MINVALUE 1

  MAXVALUE 999999999999999999999999999

  START WITH 1

  INCREMENT BY 1

  CACHE 20;


 Step 4:

Copy the XXCUS_PAY_EMP_ATTAN_CTL.ctl file to the <bin> folder of the Custom_Top.


/a01/appltest/RMCTEST/fs1/EBSapps/appl/xxrmc/12.0.0/bin


 Step 5:

Make a Concurrent Program to Upload the CSV Data to STG Table.

Navigation >> Application Developer >> Concurrent >> Executable


XXCUS_PAY_EMP_ATTAN_CTL

Navigation >> Application Developer >> Concurrent >> Program


Step 5:

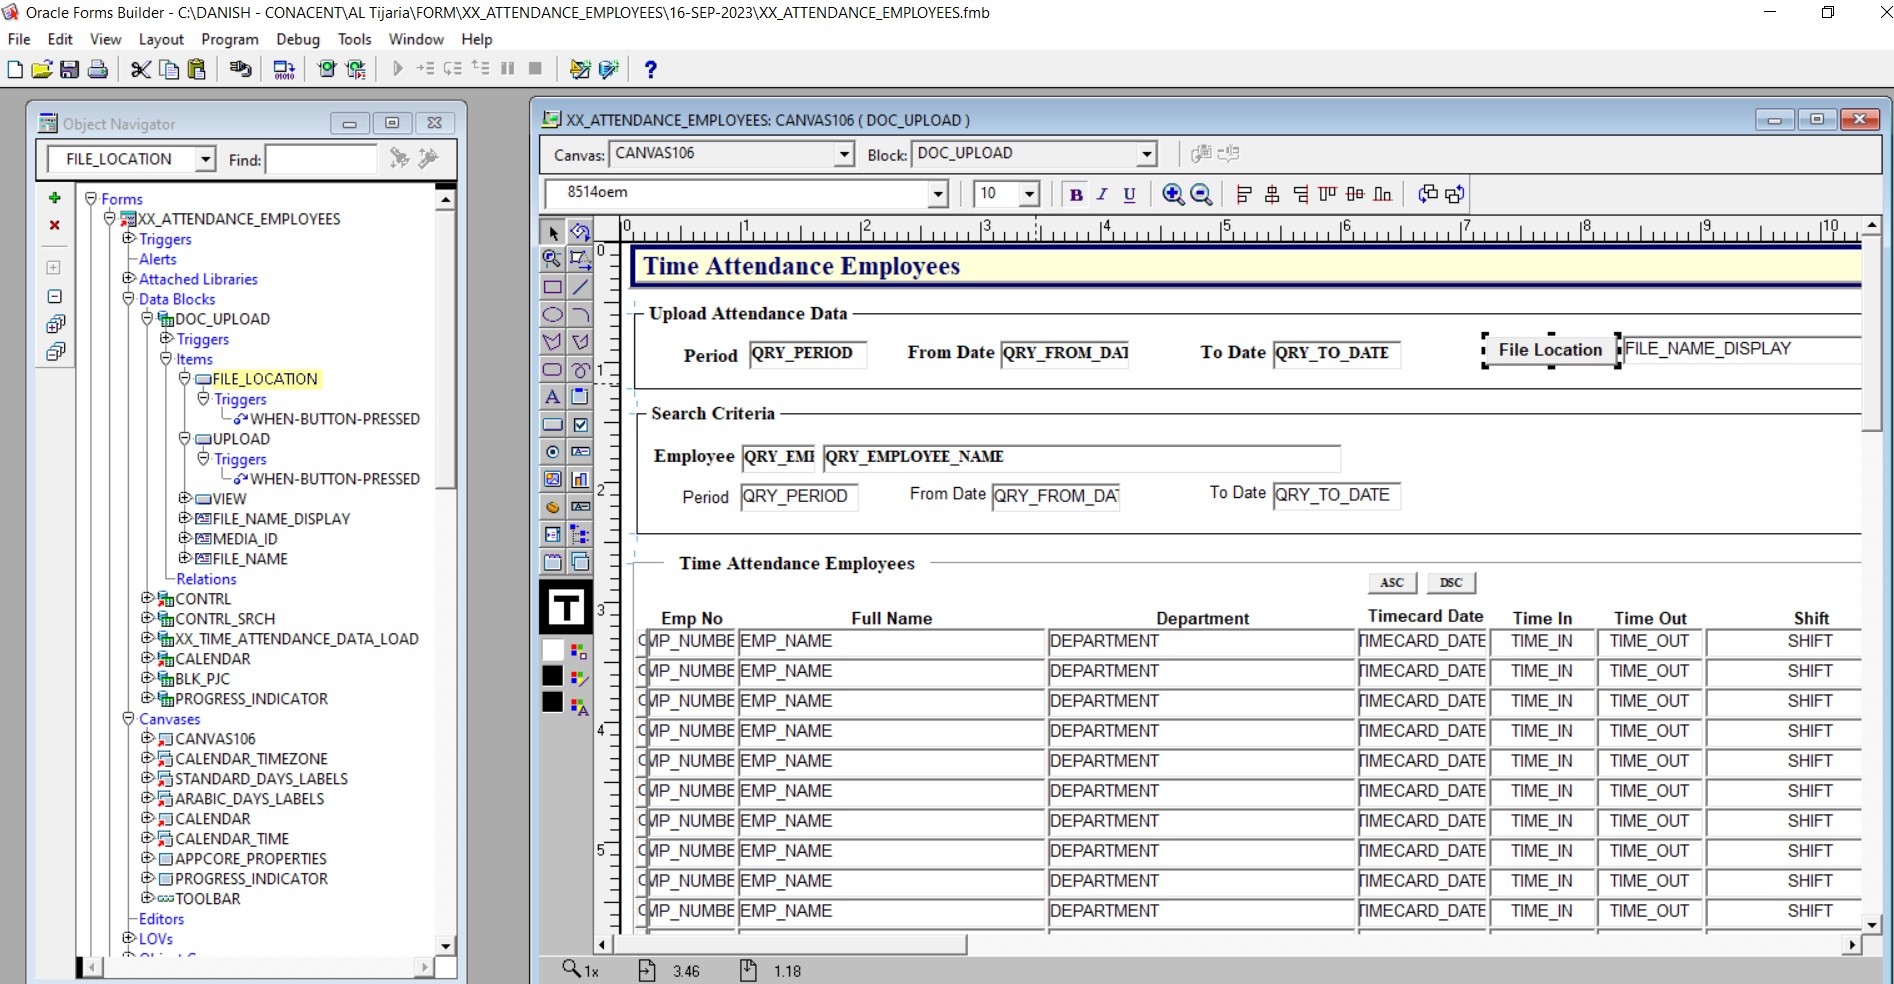
Make a custom form to upload csv File from oracle Custom forms and then show the data into the Block.


 Full Screen:


In File_Location Button : Here we call the Bowser to Select the Csv file from the PC (Our Location Machine).


We have create a Program Units Procedure “file_attached”


Here Point 1 :

Here we are set the Path of the Csv File.


Here Point 2 :

Here we are call the Database Procedure (WRITE_BLOB_TO_FILE_DH.prc) to Write Blob file to the Server Path. (Means Populate the CSV file to the Oracle Server at the respective Path)


/a01/oratest/RMCTEST/12.1.0/appsutil/outbound/RMCTEST_dev5


 If the Above Procedure getting error

ORA-29280: invalid directory path using directory in SQL 


Run the Script :


SELECT *

  FROM V$PARAMETER

  WHERE NAME = 'utl_file_dir'


Take the Value as a Path upto (,) of any Path to store the BLOB File in the Server.


Here Point 3 :

Here we call the Concurrent Program of the CTL File to Store the Data From CSV to STG Table.


Step 6:

After Click on the Upload Button a concurrent program is submitted and a Request ID is generated.

If the Program RUN successfully then Data is inserted into the Table “XXCUS_PAY_ATTAN_DOC_UPLOAD”.

 When we Click on the View Button the Stored Data is Shown into the Bellow Block.


GO_BLOCK ('XX_TIME_ATTENDANCE_DATA_LOAD');

clear_block(no_commit);

EXECUTE_QUERY;


 Create the BLOCK USING Wizard “XXCUS_PAY_ATTAN_DOC_UPLOAD “


Save the Form.

Place it to the AU_TOP and Then Compile the form.


Register the Form and Attached to the Menu.

Step 7:


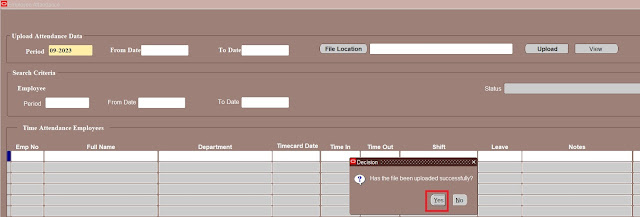
When we open the Employee Attendance Upload Form


When we click on the File Location Button. Then One popup is open


In the java HTML Page to Upload the File.


Here Point 1 : Click on the Browse Button to select the File from the Local Machine (PC or Laptop).


Here Point 2 : Then Click on the Submit Button to Save the File.


After Submit the message is coming and CLOSED the “GFM Upload” Tab.

Go the Custom Form and Click on the Yes Button.


File name is shown in the Text Box (Which CSV file we want to upload into the Below Block)


When we click on the Upload Button Then a concurrent program is fire and give the popup with Request Id.


 https://docs.google.com/document/d/15K3e2s0gbz2L9pjnRMCqHok_UBaATIW9/edit?usp=drive_web&ouid=110206717487512832707&rtpof=true

If the Program is Run Successfully then click on the View Button to See the Data in the below Block.


 https://docs.google.com/document/d/15K3e2s0gbz2L9pjnRMCqHok_UBaATIW9/edit


Thanks You


How to make responsibilities as read only in oracle apps EBS R12 Using Custom.Pll Or Creating a read only Responsibility in oracle apps EBS R12 Using Custom.Pll

  How to make responsibilities as read only in oracle apps EBS R12 Using Custom.Pll Or Creating a read only Responsibility in oracle apps ...